10. COARE and ASTI’s Quantum Circuit Simulation Project#
by Cyrel Jon Fontelo
10.1. Introduction#
High-Performance Computing (HPC) is a large computer composed of a collection of many smaller, separate servers (computers) known as nodes. These nodes are connected to each other with a fast interconnect to facilitate rapid data transfer. With this infrastructure, HPC is able to solve complex and high-speed computation problems that cannot be performed by an average computer.
Supercomputer development was originally driven to be used in applications related to national security, including nuclear weapons design and cryptography. Later on, this technology was employed by the aerospace, automotive industries, scientific research, quantum mechanics, weather forecasting, engineering, and more.
10.2. The First Supercomputer#
CDC 6600 by Seymour Cray, 1964
In the year 1964, the Control Data Corporation (CDC) 6600 made its first appearance as the world’s fastest computer. It was designed by Seymour Cray, with a peak performance of up to three million floating-point (FLOPS) or 3 Mega-FLOPS (MFLOPS), and the term supercomputer was coined to describe it.
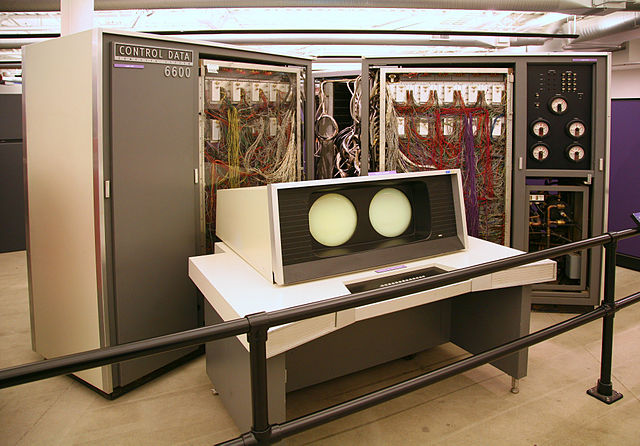
Fig. 10.1 Image source: https://commons.wikimedia.org/wiki/File:CDC_6600.jc.jpg#
Cray-1 Seymour Cray, 1976
Seymour Cray, the architect of the CDC 6600, started his own company, Cray Research Inc., in 1972. The company’s first product, released in 1976, was the Cray-1. It was also the first supercomputer to successfully implement the vector processor design, also known as an array processor, which is a central processing unit (CPU) that executes a set of instructions in large one-dimensional arrays. With a peak performance of up to 160 million floating-point (FLOPS) or 160 Mega-FLOPS (MFLOPS).
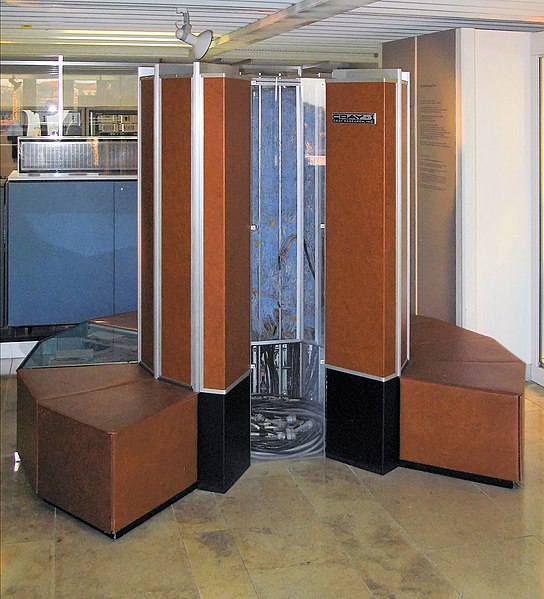
Fig. 10.2 Image source: https://commons.wikimedia.org/wiki/File:Cray-1-deutsches-museum.jpg#
10.3. DOST-ASTI COARE#
The Computing and Archiving Research Environment (COARE) was established in 2014 at the Advanced Science and Technology Institute (ASTI) of DOST. COARE is a High-Performance Computing, Data Archiving, and Science Cloud facility that provides free access to its services for the science community.
|
|


10.4. COARE Services:#
DOST ASTI COARE has 3 services available:
High-Performance Computing (HPC)
The High Performance Computing service is designed to support researchers in their computational tasks, including data analysis and simulations.
Compute node capacity
CPU nodes x 36. Each has:
88 logical CPUs, with a total of 3168 Cores(CPU)
500 GB RAM, with a total of 18 Terabytes of RAM
The current capacity is 30 TFLOPS or 30 Trillion Floating point operations per second
GPU nodes
P40 nodes x 6. Each has:
24 CPUs
1 TB RAM
NVIDIA Tesla P40 GPU x 1
A100 nodes x 2. Each has:
128 CPUs
1 TB RAM
NVIDIA Tesla A100 GPU x 8
The current capacity is 75 TFLOPS or 75 Trillion Floating point operations per second
Storage capacity
1015 TB of storage capacity
Network capacity
10 gigabits/second
Science Cloud
Another service provided by COARE is Science Cloud, which is a Platform as a Service (PaaS). This service is cloud-based and ready-to-use for developing, running, maintaining, and managing applications. It is implemented through OpenStack.
Compute and Storage capacity
3360 Virtual Cores
12.5 TB RAM
2790 TB of storage capacity
Default allocation per user of Science Cloud service.
4 logical core (CPU)
8 GB RAM (Memory)
100 GB (Storage)
4 max number of instances (Instance are the virtual server can be created)
Data Archiving
Another service offered by COARE is Data Archiving, which provides a repository that can accommodate various storage requirements, offers multiple storage options, and has a large storage capacity for COARE users. This service is implemented through the Data Catalog, a web-based research repository that is accessible to the public. The datasets stored in this repository could be integral for academics, data analysts, scientists, and other scholars in the scientific community.
1 Petabyte (PB) of storage capacity
10.4.1. Who can avail for the services?#
COARE services are available and can be used by the following:
|
|
|
|
|
Meteorologist |
Researchers |
Weather Forecasters |
Scientists |
Students |


10.4.2. HPC Service and Users#

10.4.3. Real Life Applications#
3KRG Rice Genome Project HPC is utilized by various IRRI groups for the analysis of the 3,000 Rice Genomes Project and other newly sequenced genomes

Philippine Rice Information System (PRiSM) The first rice monitoring system in Southeast Asia that uses digital technologies, such as remote sensing, GIS, and web platform PhilRice uses COARE HPC to process large rice-related datasets, automate the download of satellite images, and process and generate maps

Weather Research and Forecasting Project PAGASA utilized the HPC service to provide a high-resolution (5km) climate change projection using the WRF model Aims to contribute to strengthening communities’ and ecosystems’ resilience and adaptive capacity to climate-related hazards and natural disasters by providing timely and accurate disaster and climate information that will support risk-informed planning, particularly at the local level.

10.5. Basic commands for Linux#
Linux commands are essential tools consisting of text-based instructions used for its operating system to perform various tasks and interact with the computer or server. Each command has a specific purpose and syntax, and they are typically written in lowercase.

pwd: Print current directorycd: It stands for “change directory”.cd .makes you stay at the same directory you are at.`cd ..`` makes you shift one directory back. For example, you are at “/home/task/files” and you type “cd..” and hit enter. This will move you to “home/task”.
cd -makes you go to the previous location you were at. For example, you were at “/home” but you moved to “/dir”. Typing “cd-” command will take you back to “/home”.cd ~will take you to your home directory and “cd /” will take you to root directory.
mkdir: Create a new directory
Syntax: mkdir <directory-name>ls: Stands for list command which is used to display all the contents in a folder or directory.ls -awill show you all the files in a directory”.ls -hwill show the files while showing their sizes as well.ls -rwill recursively show the subdirectories of the directoryls -alhwill show you more details about the files contained in a folder. The details include the user permissions, last updated date, date of creation, time and the permission allotted to it like read, write and update.
cp: Stands for copy command that basically copies a file in Linux.
Syntax: cp <file-source> <destination-of-the-file>`cp -r`` copies all the contents of a folder.
cp -fwill force the copy process by deleting the destination file if a file with the same name happens to be there at the destination.cp -iwill give you a warning message before actually proceeding with the copying process.cp -uwill update the file in the destination folder only if the files have different content.cp -nwill first check if the file already exists and if it does, it just won’t copy. It doesn’t overwrite the file.cp -awill archive the file.
mv: Moves the file from one place to another.
Syntax: mv <file-source> <destination-of-the-file>touch: Create a new file with any kind of extension like text, php and html or without extension.
Syntax: touch <filename.extension>rm: Delete a file from the server.
Syntax: rm <filename>rm *will delete all the files or content in a directory.rmdirwill remove the complete directory or folder.rm -r filename or foldernamewill delete the folder as well as the folders inside it.
cat: Display content of a file on the screen.
Syntax: cat <filename>The cat command is also used to concatenate two files and show their content combined as one.
Syntax: cat [file1.txt] [file2.txt] > mergedfile.txt“>” is the output redirection characterThe cat command can also be used to create a new file.
Syntax: cat > filename.extension
head: Read the first ten lines of the content inside a file.
Syntax: head filename.extensionYou can also give the names of more than one file in the head command and it will show the first ten lines of each file separately.
Syntax: head /dir1/file1 /dir2/file2You can also change the number of lines you want to be displayed on the screen rather than the default first ten lines.
Syntax: head -n15 filename.extensionThis will display the first fifteen lines of content from the given file.
tail: Read the last ten lines of content from the file.
Syntax: tail filename.extensionAlso, you can provide multiple file names to the tail command for it to show last ten lines from each of the mentioned file.
Syntax: tail /dir1/file1 /dir2/file2Similar to the head command, the tail command also allows you to change the number of lines you want to be displayed other than the default number.
Syntax: tail -n15 filename.extensionThis will display the last fifteen lines of content from the given file.
tar: It stands for tape archive. Also used to compress and decompress folders.For compressing, that creates an archive
Syntax: tar -cvf <output-folder.tar> <folder-to-compress>
example:tar -cvf folder1.tar demofolderFor decompressing
Syntax: tar -xvf folder1.tar
chmod: Stands forchange mode. This command can change permissions of a file or directory. These permissions can be represented either by numbers from 0 to 7 or with alphanumeric characters. 4 represents reading permission, 2 represents writing permission, 1 represents executing permission and 0 represents no permission.
Syntax: chmod 754 filenameIn the above command, 7,5,4 represents the permission for the user, group and others wherein 7 is the combination of 4,2 and 1, which indicates all the three permissions are given to the user.
Similarly, 5 is the combination of 4, 0 and 1, which indicates read, no write and execute permission.
Also, 4 is the combination of 4, 0 and 0, which indicates read, no write and no execute permission.
chmod -rlets you change the permission of a folder and all the files inside it as well.
grep: Search for a particular string inside a file or folder. It returns the whole line containing the phrase if it finds the perfect match.
Syntax: grep “string” filenameThe option i in the command “grep -i “string” filename” lets you search for a string case-insensitively in the file.
To count the number of appearances of a string in the given file, use the command
grep -c “string” filename.To display the filename that contains a particular pattern or string using the command
grep -l “string” *.To display the line number along with the result using the command “grep -n
string” filename.
find: This command searches for a file inside a folder.If you want to find a file in some directory, use the command
find /directory -name filename.extension.You can look for any type of file, say a php file by using the command
find . type f -name filename.php.
vi: Vi is a classic and lightweight text editor available on most Unix-based systems. In command mode, you can navigate, search, and perform various operations on the text.
Syntax: vi filename.txtNavigate within the file in command mode:
Use arrow keys or “h” (left), “j” (down), “k” (up), “l” (right) for movement.
To search for a word, press “/” and type the word, then press “Enter.”
To delete a character, press “x.”
Enter insert mode to make changes:
Press “i” to insert text before the cursor.
Press “a” to insert text after the cursor.
Save and exit:
Press “Esc” to return to command mode.
Type
:wto save changes.Type
:wqto save and exit.
vim: Vim is an extended and feature-rich version of Vi with improved functionality.
Syntax: vim filename.txtNavigate within the file in command mode:
Use arrow keys or “h,” “j,” “k,” and “l” for movement.
To search for a word, press “/” and type the word, then press “Enter.”
To delete a character, press “x.”
Enter insert mode to make changes:
Press “i” to insert text before the cursor.
Press “a” to insert text after the cursor.
Save and exit:
Press “Esc” to return to command mode.
Type
:wto save changes.Type
:wqto save and exit.
nano: Nano is a lightweight and straightforward text editor available on many Unix systems. It provides an easy-to-use, menu-driven interface with on-screen help. Unlike Vi/Vim, Nano does not have different modes. It allows you to start editing right away.
Syntax: nano filename.txtCommon keyboard shortcuts:
To save the file, press Ctrl + O, then press Enter.
To exit Nano, press Ctrl + X.
To cut (delete) text, press Ctrl + K.
To paste text, press Ctrl + U.
To search for text, press Ctrl + W.
10.6. Connect to a High-Performance Computing (HPC)#
To connect to an HPC, you will need to use an SSH client. Some popular SSH client software includes:
PuTTY (Windows): PuTTY is a free and open-source SSH and telnet client for Windows. It is a popular choice for connecting to remote Linux servers. PuTTY is also known for its support for a wide range of authentication methods, including passwords, public key authentication, and Kerberos.
mRemoteNG (Windows): mRemoteNG is a free and open-source remote connection manager for Windows. It supports a variety of remote connection protocols, including SSH, RDP, VNC, and Telnet.
OpenSSH (Linux and macOS): OpenSSH is a free and open-source suite of cryptographic tools that includes an SSH client and server. It is the default SSH client and server on Linux and macOS systems. OpenSSH is a powerful and versatile SSH tool, and it is used by millions of people around the world.
Termius (macOS): Termius is a commercial SSH and telnet client for macOS. It is known for its user-friendly interface.
Once you have installed an SSH client, you will need to know the hostname or IP address of the HPC, as well as your username and password. This information should be provided to you by the HPC administrator.
10.6.1. Connect to an HPC from Windows 10, Linux or MacOS using terminal and other CLI software:#
Open a terminal window.
Type the following command, replace hostname with the hostname or IP address of the HPC:
ssh your_username@<hostname or ip address>If you are asked for a password, enter your password.
Note
You can also use SSH keys instead of passwords by generating them on your local machine and copying them over to the remote server.
After successfully logging in, you will now be connected to the HPC and can execute commands as if you were on the HPC itself.
When you’re done, type
exitto close the connection, and you’ll be redirected back to your local machine.Note
Some may encounter an error while using the passwordless access (SSH keys) to access the HPC. These are some common errors:
Permission denied (publickey) : This error indicates that you haven’t added the public key on the remote server yet.
Permission denied (publickey) : To resolve this issue, you need to add the public key to the authorized_keys file on the remote server.
Bad Permissions (Unprotected private key file!) : This error occurs when the permissions on your private key file are too open or allow access to others. To resolve this issue, it’s best practice to change the permission type of your private key file to 600 (read and write for the user only).
Tip
|
Image of a wsl (Windows subsystem for linux) |

10.6.2. Connect to an HPC from Windows using PuTTY:#
Open PuTTY.
In the “Host Name (or IP address)” field, enter the hostname or IP address of the HPC.
In the “Port” field, enter 22 (the default SSH port).
Click the “Open” button.
When prompted, enter your username and password.
Once you have connected to the HPC, you will be able to access your files and run jobs.
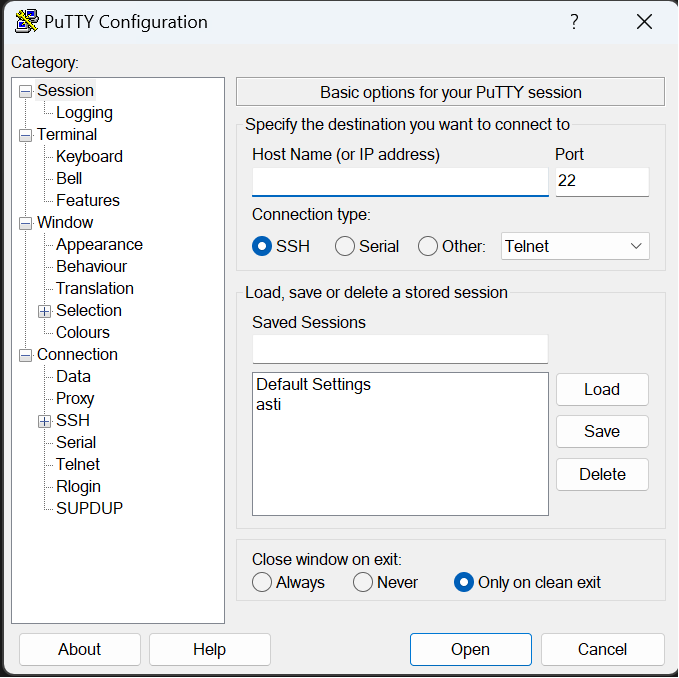
Fig. 10.3 Putty (Windows)#

Fig. 10.4 An example of being prompted for username and password#
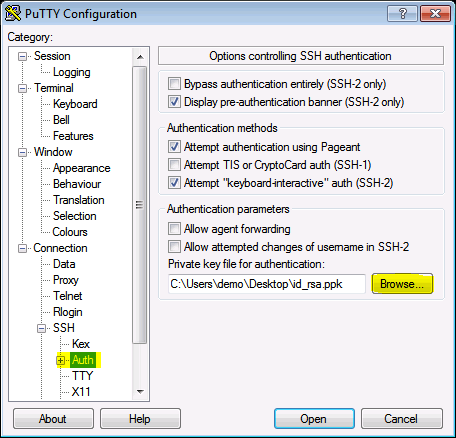
Note
Private key can also be use while using the PuTTY.
Expand
Connection tab/categoryExpand
SSH tab/categoryClick the
Authand findPrivate key file for authentication:Browse your Private key file
10.6.3. Generate SSH Key Pairs#
The SSH key pair consists of a private key and a public key. The public key should be provided to COARE, while the private key should be securely stored on your personal device (which can be your personal computer or in the cloud). The private key will be used every time a user logs in to the HPC.
10.6.3.1. Generate using Linux / MacOS / WSL#
Open a terminal window.
Type the following command:
ssh-keygen [<args>]When prompted, enter a filename for the private key. The default filename is
id_rsa.You will also be prompted to enter a passphrase for your private key. This passphrase is used to encrypt your private key, so it is important to choose a strong one.
Re-enter the passphrase to confirm it.
Once the private key has been generated, ssh-keygen will generate the corresponding public key and save it to a file with the
.pubextension. The default filename isid_rsa.pub.By default, the location of the key pair will be on the
/home-directory/user/.ssh/folder.Here is an example of how to generate a private/public key pair using ssh-keygen:

10.6.3.2. Generate using PuTTY key Generator (Windows)#
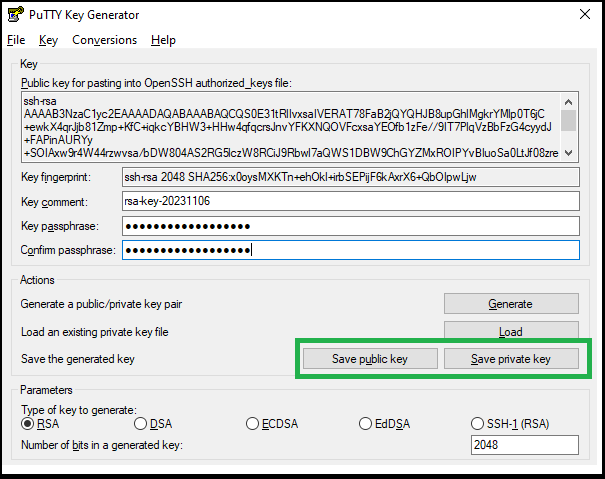
Open PuTTYgen.
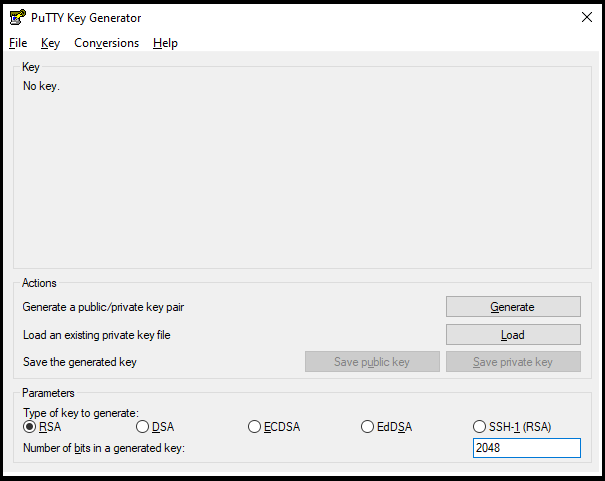
Select the type of key to generate.
Enter the number of bits in the key. 2048 bits is a good key size for most purposes.
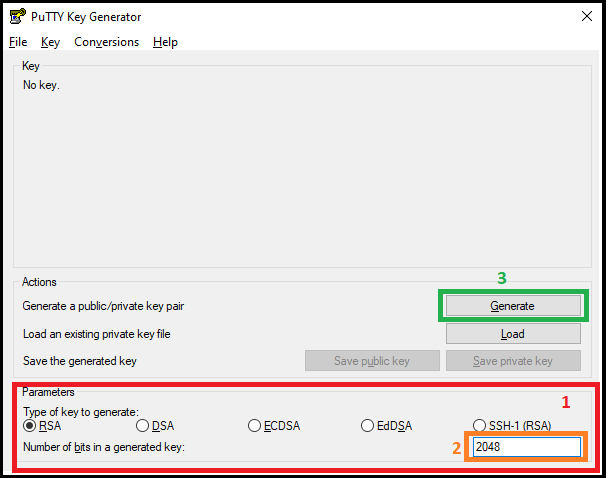
Click Generate.
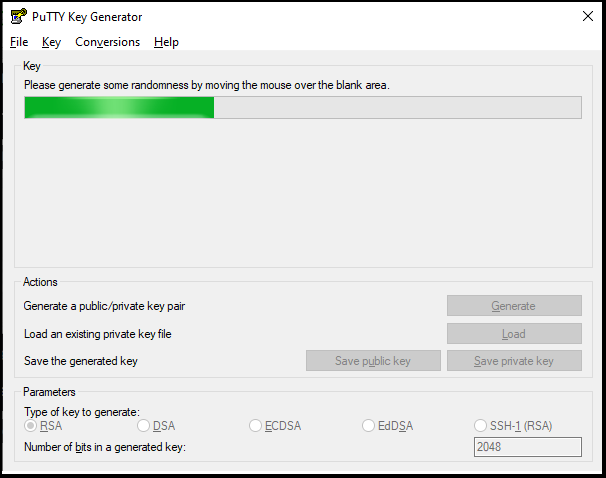
Move the mouse around the blank area of the Key section to generate random characters. The green progress bar will advance as you move the mouse.
(Optional) Enter a passphrase in the Key passphrase and Confirm passphrase fields. A passphrase adds an extra layer of security to your key pair.
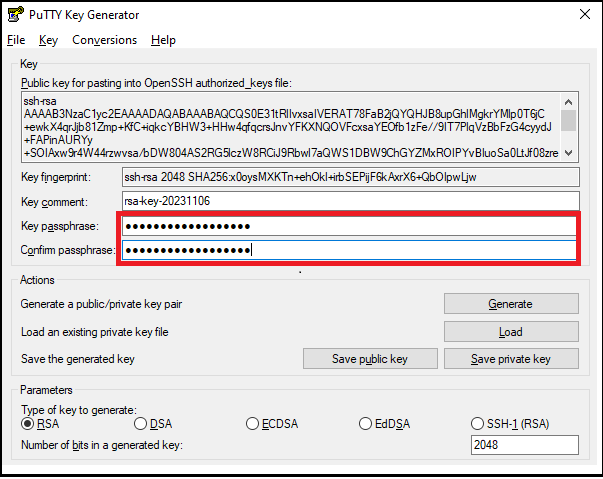
Click Save private key.
Save the private key file to a secure location.
Click Save public key.
Save the public key file to a secure location.
Warning
Keep in mind that this private key is your personal belonging.
DO NOT send to anyone else your private key.
10.7. Accessing DOST-ASTI COARE HPC#
The DOST-ASTI COARE HPC is accessible only through passwordless SSH, which requires appending SSH key(s) to the user’s account. To apply for an account, please click this link.
Once you have applied for the account and your public key has been appended, you can log in to the HPC.
10.7.1. Logging In using Linux / MacOS / WSL#
To login to the HPC, use this command in your preferred terminal:
ssh -i <path-to-your-ssh-private-key> <username>@saliksik.asti.dost.gov.ph -v
Note
Log in using IP Address, use the command.
ssh -i <path-to-your-ssh-private-key> <username>@202.90.149.55 -v
-ioption specifies the path to your private key file, for default this is located to~/.ssh/id_rsa.-voption will print more messages about its operation. This can be helpful for error messages and other relevant details. Adding morevwill increase its verbosity (i.e.,-vvand-vvv).
After successfully logging in, a welcome page will be displayed.
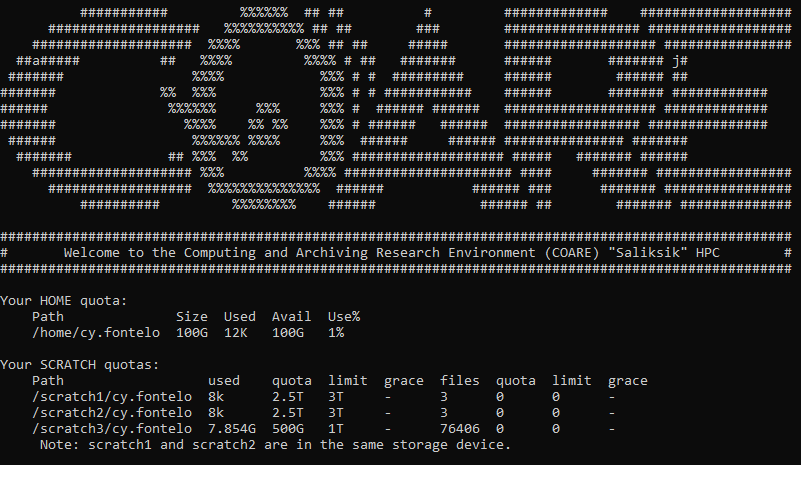
Fig. 10.5 A welcome page after logging in successfully#
10.7.2. Logging In using PuTTY (Windows)#
Open PuTTY.
In the “Host Name (or IP address)” field, enter the hostname or IP address of the COARE HPC.
In the “Port” field, enter 22 (the default SSH port).
Click the
Authand browse yourPrivate keyClick the “Open” button.
10.8. Upload and Downloading files#
Uploading and downloading files from the server refers to the two-way process of sending files from a local device to a remote server (uploading) or retrieving files from the server to the local device (downloading). This common data transfer method is essential for tasks like sharing documents, accessing cloud storage, and ensuring data backups and synchronization between devices.
10.8.1. scp ( Linux / MacOS / WSL)#
Secure Copy Protocol (SCP), is a command-line tool for securely transferring files between a local and a remote host using the SSH (Secure Shell) protocol. It provides a straightforward and secure way to copy files and directories, ensuring data encryption during transmission. SCP is commonly used for tasks like uploading and downloading files to and from remote servers, making it an essential tool for developers, and users who need to move files between local and remote systems with confidence in their data’s security.
Syntax: scp [options] source_file_or_directory destination
[options]: This part is optional and allows you to specify various options to customize the behavior of SCP. Some common options include:
-r: Recursively copy directories and their contents.-P <port>: Specify a non-standard SSH port to connect to the remote host.-i <identity_file>: Use a specific SSH private key file for authentication.-v: Enable verbose mode for more detailed output.-q: Quiet mode, which suppresses non-error messages.
Here are some examples of SCP usage:
Copy a local file to a remote server:
scp local_file.txt user@remote_server:/path/to/remote/directory/Copy a remote file to a local directory:
scp user@remote_server:/path/to/remote_file.txt /local/directory/
10.8.2. WinSCP ( Windows )#
WinSCP (Windows Secure Copy) is a popular and user-friendly graphical file transfer tool for Windows. It combines the functionality of SCP (Secure Copy Protocol) with an easy-to-use interface, allowing users to securely transfer files between a local Windows computer and a remote server over SSH (Secure Shell) or SFTP (SSH File Transfer Protocol). WinSCP offers features like drag-and-drop file transfers, remote file management, and text editor integration, making it a convenient choice for Windows users who need to interact with remote servers.
Download and install WinSCP on your Windows computer and launch the application.
To log in to the HPC, enter the following parameters in its interface:
File protocol: SFTP
Host name: saliksik.asti.dost.gov.ph (or 202.90.149.55)
Port number: 22
User name: (your HPC username)
Password: (leave as blank)
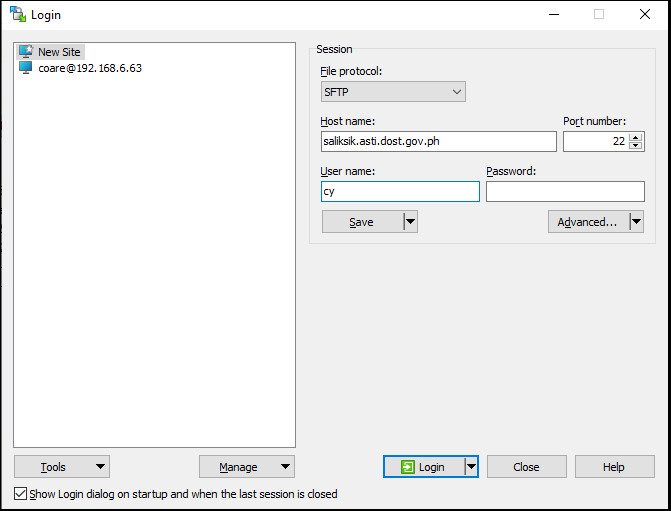
Click
Advanced...button, this will bring up the Advanced Site Settings window.Navigate
AuthenticationtabUnder the
Private key file:browse the private key that was created using PuTTYgen.Click Ok.

Click the
Loginbutton to connect to the HPC. Upon successful log in, WinSCP will bring up new interface where local and remote files are shown. Left portion will be for local and right portion for remote files.

10.9. Modules and Environments#
Modules simplify access to necessary tools, enabling users to switch between configurations and software versions without conflicts, ensuring an efficient computing environment. In HPC servers, environments are custom configurations for scientific tasks, combining software modules, system settings, and resources tailored to specific projects. Users select and activate these setups for efficient and dependency-ready computations.
10.9.1. Module Commands#
View available modules:
Syntax: module avail

Load a module:
Syntax: module load <module_name/version>Check loaded modules:
Syntax: module listUnload a module:
Syntax: module unload <module_name>Unload all loaded modules
Syntax: module purge
10.9.2. Anaconda ( Environment )#
Anaconda is a package and environment manager written primarily in Python and create isolated environments for different projects.
Initialize the conda
Syntax: module load anaconda/3-2023.07-2Create a new anaconda environment
Syntax: conda create --name myenv pythonorconda create --name myenv python=3.8Activate the environment
Syntax: conda activate myenvInstall packages. For example, to install the numpy package:
Syntax: conda install numpyDeactivate the environment
Syntax: conda deactivate
10.10. SLURM#
SLURM (Simple Linux Utility for Resource Management) is the native scheduler software for COARE’s HPC cluster. It efficiently allocates and manages computing resources, including CPUs, memory, and GPUs, among multiple users and tasks. Users can submit, monitor, and optimize jobs, ensuring efficient resource utilization in high-performance computing environments.
10.10.1. Partitions and Quality-of-Service (QOS)#
The compute nodes are grouped into partitions and each partition has its default QOS.
Partition |
Nodes |
QOS |
Limits |
Remarks |
|---|---|---|---|---|
debug |
saliksik-cpu-[21-22] |
debug_default |
86 CPUs, 1 day run time |
|
batch |
saliksik-cpu-[01-20,25-36] |
batch_default |
86 CPUs, 7 days run time |
|
serial |
saliksik-cpu-[23-24] |
serial_default |
86 CPUs, 14 days run time |
|
gpu |
saliksik-gpu-[01-06] |
gpu-p40_default |
12 CPUs, 1 GPU, 3 days run time |
To use the GPU, use either the |
gpu_a100 |
saliksik-gpu-[09-10] |
currently for limited access only |
10.10.2. Job Parameters#
Required Parameters:
These are required prior to run any job.--account:(string) group account where job quotas are set;--partition:(string) which partition the job will be submitted to;--qos:(string) the appropriate QOS in the partition;--nodes:(integer) number of nodes to request;--ntasks:(integer) total number of CPUs to request;--output:(string) job log file
Optional Parameters:
--ntasks-per-node:(integer) specify the number of CPUs per node to be requested (must not contradict –ntasks if also specified);--mem:(string) memory per node (e.g., 1G, 500K, 4GB, etc.);--job-name:(string) name for the job; will be displayed in job monitoring commands (as discussed later);--error:(string) job error file; recommended to not define this parameter and use only –output instead;--requeue:(no arg) make job eligible for requeue;--mail-type:(string) send an email to the user when the job is in the specified status, such as NONE, BEGIN, END, FAIL, REQUEUE, ALL, etc. (see sbatch manual for more info);--mail-user:(string) user’s email address;
See also
10.10.3. Job Script#
A job script outlines a computational task’s specifics, including software, resource allocation, and input/output files. It’s crucial for managing and executing complex workloads in HPC environments.
Here is sample job script.
#!/bin/bash
#SBATCH --account=<slurm_group_acct>
#SBATCH --partition=<partition>
#SBATCH --qos=<qos>
#SBATCH --nodes=<num_nodes>
#SBATCH --ntasks=<num_cpus>
#SBATCH --job-name="<jobname>"
#SBATCH --output="%x.out"         ## <jobname>.<jobid>.out
##SBATCH --mail-type=ALL          ## optional
##SBATCH --mail-user=<email_add>  ## optional
##SBATCH --requeue                ## optional
##SBATCH --ntasks-per-node=1      ## optional
##SBATCH --mem=24G                ## optional: mem per node
##SBATCH --error="%x.%j.err"      ## optional; better to use --output only

## For more `sbatch` options, use `man sbatch` in the HPC, or go to https://slurm.schedmd.com/sbatch.html.

## Set stack size to unlimited.
ulimit -s unlimited

## Benchmarking.
start_time=$(date +%s.%N)

## Print job parameters.
echo "Submitted on $(date)"
echo "JOB PARAMETERS"
echo "SLURM_JOB_ID          : ${SLURM_JOB_ID}"
echo "SLURM_JOB_NAME        : ${SLURM_JOB_NAME}"
echo "SLURM_JOB_NUM_NODES   : ${SLURM_JOB_NUM_NODES}"
echo "SLURM_JOB_NODELIST    : ${SLURM_JOB_NODELIST}"
echo "SLURM_NTASKS          : ${SLURM_NTASKS}"
echo "SLURM_NTASKS_PER_NODE : ${SLURM_NTASKS_PER_NODE}"
echo "SLURM_MEM_PER_NODE    : ${SLURM_MEM_PER_NODE}"

## Create a unique temporary folder in the node. Using a local temporary folder usually results in faster read/write for temporary files.
custom_tmpdir="yes"

if [[ $custom_tmpdir == "yes" ]]; then
   JOB_TMPDIR=/tmp/${USER}/SLURM_JOB_ID/${SLURM_JOB_ID}
   mkdir -p ${JOB_TMPDIR}
   export TMPDIR=${JOB_TMPDIR}
   echo "TMPDIR                : $TMPDIR"
fi

## Reset modules.
module purge
module load <module1> [<module2> ...]

## Main job. Run your codes and executables here; `srun` is optional.
[srun] /path/to/exe1 <arg1> ...
[srun] /path/to/exe2 <arg2> ...

## Flush the TMPDIR.
if [[ $custom_tmp == "yes" ]]; then
   rm -rf $TMPDIR
   echo "Cleared the TMPDIR (${TMPDIR})"
fi

## Benchmarking
end_time=$(date +%s.%N)
echo "Finished on $(date)"
run_time=$(python -c "print($end_time - $start_time)")
echo "Total runtime (sec): ${run_time}"
10.10.4. Job Management#
Submit Job Script
It is recommended to submit the job inside the folder containing the job script. It is also recommended that any and all input and/or output files be within the same folder where the job script is located. This is to avoid changing working directories which may result in confusion and possible errors in accessing files/folders. For example, if the job folder is at/home/username/scratch3/test-jobwhere all the necessary input files are stored together with the job script namedjob.sbatch.
Syntax: cd /home/username/scratch3/test-jobThis is to ensure that the job will run on the scratch folderSyntax: sbatch job.sbatchorsbatch job.shShow Job Queue
Syntax: squeue -u <username>Show Job Parameters
Syntax: scontrol show job <job_id> # or jobid=<job_id>Check Node and/or Partition Status
Syntax: sinfo [-p <partition> | -n <nodelist>]Cancel Job(s)
Syntax: scancel <job_id1> [<job_id2> ...]
10.11. References#
An Overview of Cluster Computing |
|
Supercomputer |
|
Conversion Calculator |
|
History of Supercomputers |
|
Supercomputer |
|